Using Python's Virtual Environment with Jupyter Notebook
In this blog, we will see how to use Python's virtual environment venv with Jupyter Notebook. Using virtual environments with Jupyter Notebook can be somewhat tricky but it is essential to use virtual environments to manage separate package installations for different projects so as to not get dependency errors.
Note that I am using Linux and the example images shown will also be from Linux. The commands given for windows are not tested.
Installing Jupyter Notebook
Assuming that you already have Python installed on your system, open up the terminal and enter the following in your terminal.
pip install notebook
This will install jupyter notebook and required packages globally in your system. Now if you run python3 -m notebook , jupyter notebook should open in your browser. You can look around in the notebook but don't install anything just yet. We still have to create and activate a virtual environment first.
Creating and Activating a Virtual Environment
The next step is to create a virtual environment. Create a new folder named my_projects in your preferred location on your machine. Go inside the my_projects folder, right click and select the option to open the folder in terminal. Then your terminal will open in the my_projects folder. The terminal will look something like this. It will be different if you are not using Linux Mint but the important thing is that the location is inside the my_projects folder.

In the terminal type in the following command and hit enter.
python3 -m venv venv #LINUX
python -m venv venv #WINDOWS
This will create a folder named venv in the my_projects folder. This venv folder is the new virtual environment we just created. It contains isolated python environment for our project. From now on, any python packages we install will be inside the venv folder. We could also have installed jupyter notebook inside a virtual environment but in this blog, we are installing jupyter notebook globally and other packages in a virtual environment.
Now, let us activate the virtual environment venv. Enter the following in your command prompt.
source venv/bin/activate #LINUX
.\venv\Scripts\activate #WINDOWS
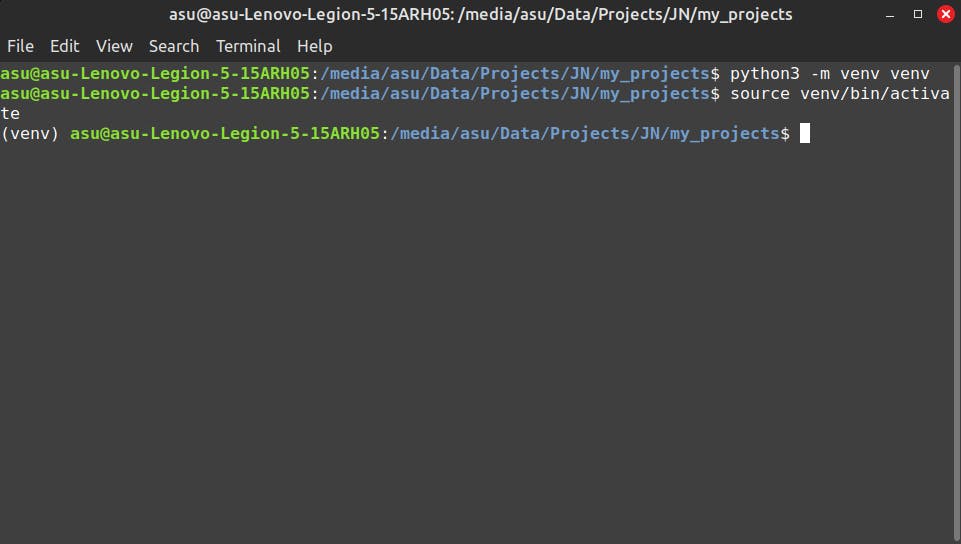
Now your terminal should show "(venv)" at the start of the line as shown in the image below. This indicates that the virtual environment named venv is now active. Now, whatever package we install using pip will be installed in this virtual environment.

Installing a new kernel
In the context of Jupyter Notebook, a kernel is a computational engine that executes the code contained in a notebook document. We can create kernels for different languages including Python, Julia, R, Ruby, and more. To create a kernel for Python, we first need to install the ipykernel package. Enter the following in the terminal.
pip install ipykernel
Since we have our virtual environment active, this package will be installed in it. You can verify it by going to venv/lib/python3.10/site-packages and searching for 'ipython'. You will see a folder by its name.
Now, let's install a new kernel also named venv. Enter the following in the terminal.
python3 -m ipykernel install --user --name=venv #LINUX
python -m ipykernel install --user --name=venv #WINDOWS
The above command will install a new kernel and give you the location where it is installed. The output will look something like this.

If you go to the location shown in the terminal, you will see a folder named venv. This is the new kernel we just installed.
Using different packages in the notebook
Now, let's open the notebook and install some packages. Open up a new terminal in the same directory as the current terminal. But make sure to not close the current terminal. In linux, you can just open up a new tab in the terminal by pressing Shift+Ctrl+T. In the new terminal, enter the following.
python3 -m notebook #LINUX
python -m notebook #WINDOWS
This should open jupyter notebook in the browser. You should see a folder named venv which is the same virtual environment inside the my_projects folder. Create a new notebook by clicking on New dropdown and selecting Notebook.

This will open a new notebook in a new tab in your browser and prompt you to select a kernel for the notebook as shown below.

Select the venv kernel we just installed.
Then in the first cell, try to import numpy by typing import numpy. It will give you a ModuleNotFoundError as shown below.

Now go to the old terminal where the venv virtual environment is active and install numpy by entering pip install numpy in it as shown below.

Now, import numpy again in the notebook. It will execute perfectly fine as shown below.

That's it. We install whatever packages we need in the venv virtual environment and select the venv kernel for executing the code.
Uninstalling the kernel and deleting the virtual environment
Once you are done with your project, you may want to remove the virtual environment and the kernel for the project.
You can delete the virtual environment by simply deleting the venv folder that is inside the my_projects folder.
You can uninstall the kernel by running the following command in the terminal.
jupyter kernelspec uninstall venv
That's all.